When I was originally working on re-creating Spyro: Reignited Trilogy portals in Unity, I came across stencil shaders when researching how to render the backgrounds. At first, I didn’t understand them very well, but I quickly learned how powerful they can really be.
One example used in a lot of tutorials was Antichamber, and how they created the magic cubes that would show a different shape inside of the cube depending on which side you looked like - at first, it seemed like a very difficult effect to achieve, but I quickly learned that stencil shaders make it much more simple.
Stencil Shaders#
What Are They?#
Before diving into writing any code, we’ll learn about stencil shaders and what they are to better understand what is happening under the hood.
A typical render pipeline is made up from various buffers used to store data, and one of them is stencil buffer, or Shader Storage Buffer Object (SSBO), which used to store stencil specific data.
Each object has a stencil ID value that they write to the buffer, and by default all objects write 0 and they are always rendered by our camera. With a stencil shader, we can change that ID, and change how we render the object - this is called a stencil function/operation.

In the above example we have two shapes: a blue sphere, and a grey quad; currently, they are both using the default shaders, which means they are always rendered. With stencil shader, we can make it so that the sphere is only visible behind the quad.
Stencil Operations#
Each stencil effect is normally made up from two shaders: one writes to the stencil buffer, and one reads from the buffer and performs comparison to see what to do with the pixel.
Let’s start with our sphere, it will be reading from the stencil buffer.
Stencil
{
    Ref [_ID]
    Comp Equal
}
Inside our stencil block we declare two properties:
Ref- the reference value that is written/read.Comp- the comparison function used in this stencil shader.
The _ID value is just a int I have declared in the ShaderLab properties block, just like any other shader property in Unity. When it comes to the comparison functions, we have a list we can choose from and Equal is one of them - others can be found on the Unity documentation.
In this case, we’re saying that if the buffer value is equal to our value (_ID), the comparison will return Pass, and if the values are different then it will return Fail. That is all we need to do for our sphere - with the stencil block, you will notice the sphere is invisible (but is still in the scene).
Full Stencil Read Shader
Shader "StencilRead"
{
    Properties
    {
        [IntRange] _ID("Stencil ID", Range(1, 4)) = 1

        _BaseMap("Base Map", 2D) = "white" {}
        _BaseColor("Base Color", Color) = (1,1,1,1)
    }
    SubShader
    {
        Tags
        {
            "RenderType" = "Opaque"
            "RenderPipeline" = "UniversalPipeline"
            "Queue" = "Geometry"
        }

        Pass
        {
            Name "ForwardLit"
            Tags { "LightMode" = "UniversalForward" }

            Stencil
            {
                Ref [_ID]
                Comp Equal
            }


            HLSLPROGRAM
            #pragma vertex vert
            #pragma fragment frag
            #include "Packages/com.unity.render-pipelines.universal/ShaderLibrary/Core.hlsl"
            #include "Packages/com.unity.render-pipelines.universal/ShaderLibrary/Lighting.hlsl"

            struct Attributes
            {
                float4 positionOS : POSITION;
                float3 normalOS : NORMAL;
                float2 uv : TEXCOORD0;
            };

            struct Varyings
            {
                float4 positionHCS : SV_POSITION;
                float3 normalWS : NORMAL;
                float2 uv : TEXCOORD0;
            };

            TEXTURE2D(_BaseMap);
            SAMPLER(sampler_BaseMap);

            float4 _BaseColor;

            Varyings vert(Attributes IN)
            {
                Varyings OUT;
                OUT.positionHCS = TransformObjectToHClip(IN.positionOS);
                OUT.normalWS = TransformObjectToWorldNormal(IN.normalOS);
                OUT.uv = IN.uv;
                return OUT;
            }

            half4 frag(Varyings IN) : SV_Target
            {
                half3 albedo = SAMPLE_TEXTURE2D(_BaseMap, sampler_BaseMap, IN.uv).rgb * _BaseColor.rgb;

                // Simple diffuse lighting
                half3 normal = normalize(IN.normalWS);
                half3 lightDir = normalize(_MainLightPosition.xyz);
                half NdotL = saturate(dot(normal, lightDir));
                half3 color = albedo * _MainLightColor.rgb * NdotL;

                return half4(color, 1.0);
            }
            ENDHLSL
        }
    }
}
Now that we’re reading a value from our stencil buffer, we should write something to it too - this is where our second stencil shader comes into the action, which will write a integer value to the buffer.
Stencil
{
    Ref [_ID]
    Comp Always
    Pass Replace
    Fail Keep
}
We can see the familiar Ref property, it works in the same way as in the read shader; Comp also works the same way, but in this case Always specifies that the comparison should be carried out each time, not just when the values are equal (as we want to keep the original pixel if comparison with write shader fails).
The two new properties are:
Pass- the operation carried out when the comparison function passes.Fail- the operation carried out when the comparison function fails.
In our case, when the comparison passes (our reference values match) we want to replace our pixel with the pixel from the other object (our blue sphere), but if we fail we want to keep the original pixel (background).
If we were to visualize the stencil buffer, we’d see something like the image below - the operations are ran per pixel, but it was easier to visualize the effect by overlaying the numbers over the shape.

Full Stencil Write Shader
Shader "DP/StencilWrite"
{
    Properties
    {
        [IntRange] _ID("Stencil ID", Range(1, 4)) = 1
    }
    SubShader
    {
        Tags
        {
            "RenderType" = "Opaque"
            "RenderPipeline" = "UniversalPipeline"
            "Queue" = "Geometry-1"
        }

        Pass
        {
            Blend Zero One
            ZWrite Off

            Stencil
            {
                Ref [_ID]
                Comp Always
                Pass Replace
                Fail Keep
            }
        }
    }
}
Stencil Cube#
With this knowledge, you now might be starting to see how we could potentially put the final effect together - if not, then don’t worry it will click together.
The next step is creating the cube effect - we will need a 3D model, I have quickly made a model in Blender; the raw asset as well as exported fbx files are available on the GitHub repo linked at the bottom of the post.

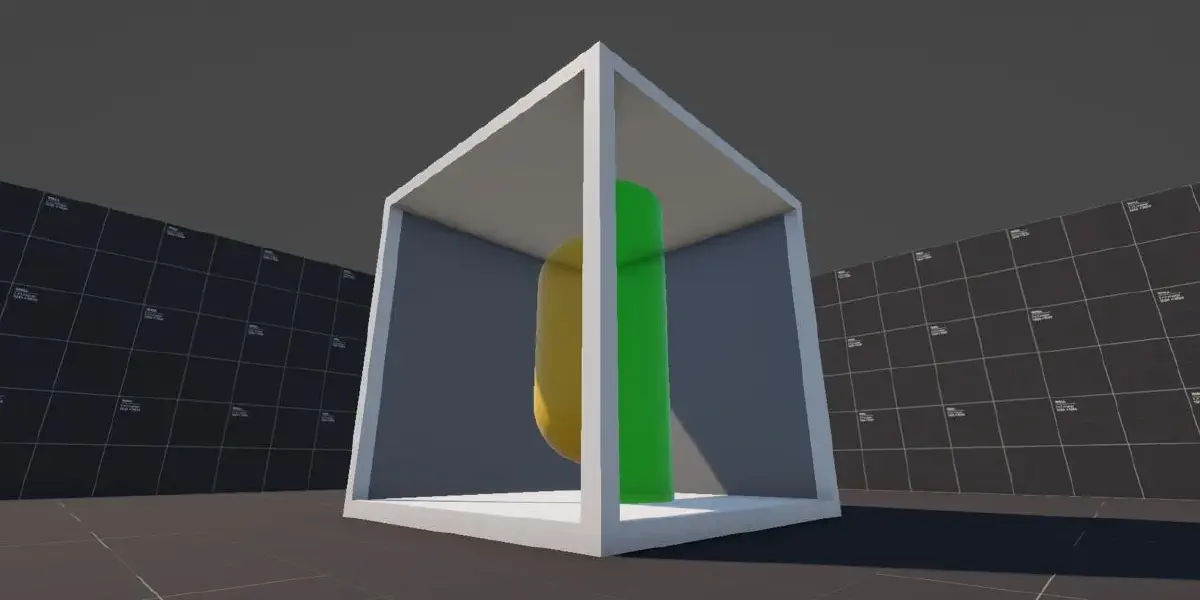
In the center of the cube, I have placed four shapes: a sphere, a rotated cube, a cylinder, and a capsule - you can’t see it really well on the image below, as the shapes are overlapping, but they are all there.

Finally, we need to create our “windows” (faces that fill in the gaps in the cube) - for that I have used simple quads, which I have scaled up to fit perfectly in each gap.
We need to create a read/write material for each shape/window, and we need to apply them to their relevant object; for each pair, we want to choose a unique ID value - I have went with simple 1/2/3/4.
With everything set up, we can see our effect come alive!

Limitations#
There are some limitations to this approach, the first one is caused by the fact we need a custom read/write stencil shader, which means we can’t use a default Unity shader.. we need to write our own implementation to work with the stencil shader.
Another limitation, is that we need two materials per shape - in the case of our cube, we had to create 4 materials for shapes, and 4 materials for edges, and that is 8 materials in total. This isn’t too bad for a cube, but take a shape like dodecahedron and that is 24 materials!
Depending on your use case, those might not be an issue, but what if I told you there is another approach too?
Using Render Pipeline#
Recently when re-writing this article, I have discovered Daniel Ilett’s video on the same effect, but Daniel has used a slightly different approach which I didn’t know about.
I’m going to summarize the approach, for a more in-depth explanation please see Daniel’s video - the approach Unity’s render pipeline, where we can define our ID and comparison function on the pipeline level, and we can test against a layer (versus individual object).
This means that our objects inside the cube can use whatever shader we’d like, as it no longer requires custom stencil shader (pipeline does that for the whole layer), and we only need the shader that carries out comparison and defines pass/fail criteria.
With this approach we only need 4 materials, and 4 layers, in the cube example. With this setup, you will end up with the same effect as you’ve seen at the top of this post.
Thank you for taking your time to read this post, I very much appreciate your time! If you have any comments, suggestions, or requests, feel free to reach out to me via my social media below!
You can find the complete project, with both approaches, over at my shader vault on Github: