Signed Distance Fields have always fascinated me. While I’ve used them sporadically in my work, I’ve never delved deeply into their theory until a recent holiday inspired me. Playing pool with family sparked an idea: Could I use SDFs to procedurally generate realistic pool balls? In this post, I’ll explore the process, from research to implementation.
What are Signed Distance Fields?#
Signed Distance Fields (SDFs), also referred to as Signed Distance Functions, are mathematical equations used to describe the distance, from a point to the surface of the shape.
These functions are signed (as the name suggests), which means that the inside of the shape will return a negative value, and outside of the shape will return a positive value.
The two main articles I used were the iquilezles’s SDF functions list, and XOR’s article on SDFs; whilst I will be explaining my thought process, I highly recommend getting familiar with both of the articles as they will provide all the knowledge you’d need to follow this article and understand how SDFs work.

SDFs are very powerful; they not only allow you to draw primitive 2D shapes, but you can also combine them to create more complex shapes; additionally SDFs are not just limited to 2D shapes, as 3D shapes can also be rendered using 3D SDF functions.
I will not be using those, but iquilezles has an article about them.

Implementation in Unity#
With the knowledge from iquilezles and XOR, I was ready to start working on the shader; I cloned my template repo, booted up Unity, and created an unlit URP shader using Unity’s template.
Throughout this article I will be providing HLSL code snippets, and ShaderGraph screenshots, but you can also get the source from the repository linked at the top.
I started by renaming _BaseColor to _Base_Color. This property defines the top/bottom of the ball when using stripe; otherwise, we’ll use a new property _Accent_Color which I have created.
half4 frag(Varyings IN) : SV_Target
{
    half2 center = float2(0.5, 0.5);

    half4 color = _Base_Color;

    return color;
}
Horizontal Stripe#
First, I started working on the horizontal stripe that is used in various pool games, for example 8-ball or 9-ball. To draw the horizontal line, we first need to find the center of our UVs for the current pixel so we can simply subtract 0.5 from our current UV.y value.
0.5, thus allowing us to subtract it from our current UV value to get the distance.We also need to know how large the line should be, and since we’re working from the center of UVs we know that the line can only ever be in the range of 0…0.5, so I created a new property _Line_Thickness of type Range(0, 0.5). Now we can start calculating our line, first we need to calculate the distance, and then use it in a smoothstep() function for our SDF line.
float lineDistance = length(IN.uv.y - center.y) - _Line_Thickness;
float lineMask = smoothstep(0.01, 0.0, lineDistance);

return float4(lineMask, lineMask, lineMask, 1.0);We’re using smoothstep here to smoothly interpolate between the ‘inner’ and ‘outer’ parts of our shape - alternatively, we could’ve used step() function to create a sharp transition, but I found it results in jagged edges as it compares the two properties, returning 0.0 if the second is smaller than the first, or returning 1.0 otherwise.
We can now use lerp() to linearly interpolate between the base color and the color of our stripe, using line mask as our interpolation value. _Accent_Color is the color we will apply to the ball’s stripe (or the ball if it has no stripe).
float lineDistance = length(IN.uv.y - center.y) - _Line_Thickness;
float lineMask = smoothstep(0.01, 0.0, lineDistance);

color.rgb = lerp(color.rgb, _Accent_Color.rgb, lineMask);
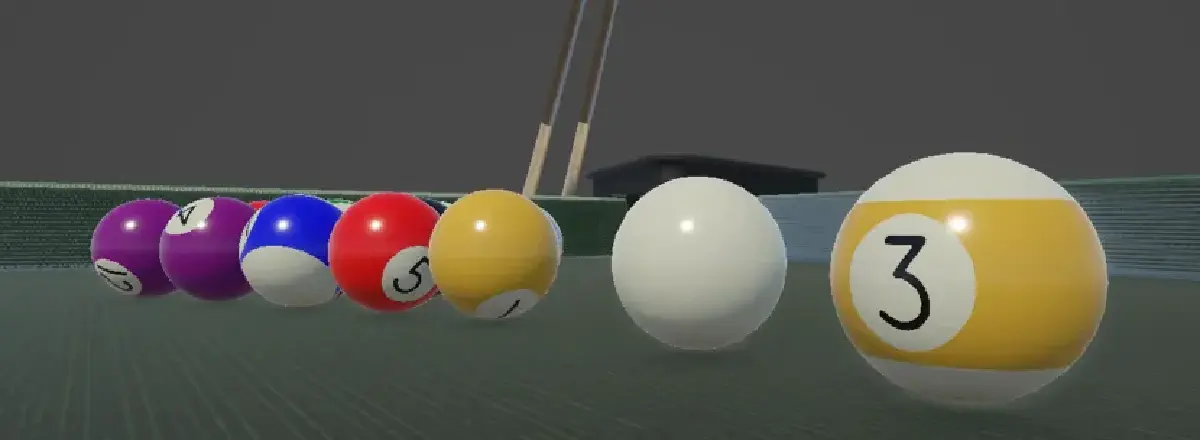
With the progress so far, we can already create a variety of pool balls:
- Cue Ball: Traditionally blank white ball which players hit with the cue.
- British Style: White cue ball, with Red/Yellow solid balls with no numbers and a single 8-ball.
- Carom Style: White and Yellow Cue balls, with two solid red balls.
Number Circle#
We can now start working on the next step which is the circle behind the number.
We will use a similar method to render our circle, so we need to know the point from which we want to draw the circle and its radius; unlike the horizontal line, we want to use both U and V values here. I created a new property _Radius of type float.
float circleDistance = length(IN.uv - center) - _Radius;
float circleMask = smoothstep(0.01, 0.0, circleDistance);

return float4(circleMask, circleMask, circleMask, 1.0);Great progress so far, but you might’ve noticed a small issue - if you haven’t, no worries as I didn’t spot it myself initially! The circle mask we have just created only shows on one side of the ball, this is because as I’ve mentioned before the UVs are in the 0…1 range with the UVs stretching across the whole shape.
In more simple terms, if you take a piece of paper with a dot in the middle and you wrap it around the ball so the edges meet at the back, you won’t see the dot twice. In order to compensate for this, we need two pieces of paper that are half in width; now if we stick one of the edges together, and then wrap the paper around the ball we will see the dot twice.

Luckily for us, we can fix this quite easily!
As you can see in the above example we can use the tiling and offset node in ShaderGraph, we have access to this in HLSL as well if we declare float4 _Number_Atlas_ST, or if we just manually multiply U by 2. In HLSL I have opted out to multiply the U, but in ShaderGraph I made use of tiling and offset node.
Now we just need to apply some color to our pool ball. Looking at some references, I’ve noticed that in most pool balls the circle shares the same color as the top/bottom of the ball with stripe.

In order to add some color to our ball, we can once again use lerp to linearly interpolate between two values just like we have done with the horizontal line; since the line is already part of color, we can lerp between it and the base color value to “cut out” a hole in the horizontal line:
float circleDistance = length(circleUVs - center) - _Radius;
float circleMask = smoothstep(0.01, 0.0, circleDistance);

color.rgb = lerp(color.rgb, _Base_Color.rgb, circleMask);
The same exact logic can be translated to ShaderGraph:

Ball Numbers#
Now time for probably the most difficult part of the article - rendering the ball numbers for which we will make use of a technique called SDF numbers. I have come across this concept before at work, but I wasn’t developing the component which required it thus it went over my head. I have found a video by Ben Cloward on how to create sharp text using shaders; this is exactly what I was looking for.
First thing we will need is a texture with our numbers. Since I’m creating the 8-Ball style pool balls, we will need 15 numbers and a blank spot (no number) which results in 16 spaces required. We can lay out the sprites in various ways, but I have opted for a 4 by 4 grid as that will work well with our requirements and will provide a power of 2 texture.

Here comes the more difficult part, we need to sample our texture based on the number we want to show - first, we’ll create a new property called _Number of type Integer with a range of 0…15:
// Genuinely didn't know [IntRange] was a thing in ShaderLab..
[IntRange] _Number("Number", Range(0, 15)) = 3
Just like with the number circle, we want to show the number at the front and the back of the ball so we can copy the same logic:
float2 numberUV = IN.uv;
numberUV.x *= 2;
numberUV = frac(numberUV);
Now there is a small catch. In Unity the UV coordinates start in the bottom left, but our texture starts in top left; we will find that our numbers don’t match up once sampled.. there are two ways we can correct it:
- We could remake the texture, making sure 15 is in top left and the empty gap is in bottom right.
- We could account for it by doing some extra math.
I have opted out for option 2 as its good to know how to account for this issue, especially since you’re most likely to work with a texture that is created this way.
Luckily for us the fix isn’t difficult, we just need to center the UVs, offset the V (row) by 3 (since we have 4 rows) and offset the UV back to bottom left.
int vOffset = 3;

numberUV = (frac(numberUV) - center) * vOffset + center;
Now with that accounted for, we can start calculating our offsets.
Getting the U value is quite straight forward as we need to use modulo operator to compare our current number against the atlas size (4). To get the V value, we need to multiply the current number by 0.25 (1/atlas size) and floor it; finally we can subtract that from the v offset.
float u = fmod(_Number, _Number_Atlas_Size);
float v = vOffset - floor(_Number * 0.25);
Finally, to get our final UVs for the selected number we add the calculated U/V offsets to the original number UVs and multiply the whole thing by 0.25 again (1/atlas grid size). I have renamed the base texture property to _Number_Atlas, and I have assigned the number atlas texture to it; we only need a single channel from the texture.
float2 atlasUV = (numberUV + float2(u, v)) * 0.25;
float numberSample = SAMPLE_TEXTURE2D(
    _Number_Atlas,
    sampler_Number_Atlas,
    atlasUV
).r;
Nearly there! As the final step, we need to subtract a max value and divide the sampler by a min/max difference as explained in Ben’s video; I have created two new properties _Edge_Min and _Edge_Max:
numberSample -= _Edge_Max;
numberSample /= _Edge_Min - _Edge_Max;
numberSample = saturate(numberSample);
Now that we have our SDF number, we can use a lerp node to make sure the number isn’t spilling outside of the circle by using linear interpolation and using the circle mas as the interpolation value; the final value can be interpolated again, between color and a color value for our numbers (I created a color property to make it adjustable from editor), and we want to use masked number as our interpolation value.
float maskedNumber = lerp(0.0, numberSample, circleMask);
color.rgb = lerp(color.rgb, _Numbers_Color.rgb, maskedNumber);

return color;
Not too bad, right? I found that the ShaderGraph version is a little more involved, and there possibly is a better way to do it, but the version I have here is what worked for me - I’m open for suggestions though!


Results and Adjustments#
Well done, you’ve made it! With this shader, we can easily create a variety of different pool balls (not just US-style 8/9 ball); because the shader is procedurally generating the lines, number background, and the number itself, we can apply it to different sized balls and the lines will remain crisp.

The next part isn’t mandatory, but there are some quick tweaks we can make to improve the shader. We most likely don’t want to show the number circle when there is no number (0 is selected), we can use saturate() with our current number to get a value of either 0 or 1 (saturate clamps the value in 0…1 range) and we can multiply our circle mask by that value.
float circleMask = smoothstep(0.01, 0.0, circleDistance);
circleMask *= saturate(_Number);
This approach avoids branching logic, which is ideal when writing shaders as GPUs don’t handle branching logic as well as CPUs do.
Additionally, I have also updated the way we sample our font texture; I have updated it from the example in Ben’s video, to the same approach as our stripe and circle that utilize smoothstep.
float numberSample = SAMPLE_TEXTURE(_Number_Atlas, sampler_Number_Atlas, atlasUV).r;
numberSample = 1.0 - numberSampler;
numberSample = smoothstep(_Edge_Min, _Edge_Max, numberSampler);
If you’d like to challenge yourself, try to add an option to enable red dots on the cue balls (often seen in televised pool games).
Thank you for taking your time to read this post, I very much appreciate your time! If you have any comments, suggestions, or requests, feel free to reach out to me!
Source code to the HLSL shader, ShaderGraph, and project files are available in the GitHub repository linked at the top of the post.